The Android Market is taking off. In March, over 9,000 applications hit the Android market, doubling the amount added the previous month, impressing Android users everywhere. Given the huge amount of new Android phones coming out this year, it doesn’t seem like things are going to level off anytime soon.
Recently, Google announced that they are sending free Nexus One or Droid devices to developers with 3.5+ stars and 5,000+ downloads on their applications – making it that much more attractive to become a (good) Android developer.
Want to know how to write Google Android apps? Android applications are written in Java – a relatively easy to learn, friendly language for new developers. Aside from the possibility of a free Nexus One and some money, you could actually contribute to the Android community. If you’ve got innovative ideas and the drive to see them spread, the Android market is for you! Let’s get you started on your very first Android application.
Before we get to how to write Google Android apps – first, a bit of overview. Android apps (much like almost any mobile app) are developed on a computer – PC or Mac (generally) – and then compiled and sent to the device for testing. If you don’t have an Android device yet, there are emulators that simulate an Android device on your computer, meaning that you can still develop an Android game or application without owning one.
Read the steps after the break!
Step 1: Get Eclipse
For this tutorial, I’m going to use Eclipse, because frankly it’s the easiest and most hassle-free development tool for Android right now. If you’re a NetBeans programmer, be my guest; but I’ll use Eclipse today.
Download Eclipse IDE for Java Developers (PC or Mac, 92MB)
Note: This is a .zip file; when you unzip it you will be able to run it wherever you unpacked it – there is no installer. I’d recommend that you put this in “C:\Program Files\” unless you plan on making it a portable application on a USB drive or something.
Step 2: Download The Java JDK
If you don’t have it already, you need to download the Java JDK 6. If you currently have the JDK 5, you should be okay, but there’s really no reason not to update. Just install it by downloading and then running through the setup to get things going. I’d recommend that you just hit next–>next–>finish, rather than doing anything fancy. Once you get things working, you can mess around a bit.
Step 3: Download The Android SDK Tools
Next, you’ll need to get the Android SDK Tools straight from Google. Unpack and install this to a directory you’ll remember – you need to reference this in the next few steps.
Step 4: Configure Eclipse For Your Android
Start Eclipse, and head to ‘Help>Install New Software‘. Hit “Add…” and for the name, type “Android” and set the link to “https://dl-ssl.google.com/android/eclipse/” (if this doesn’t work, try it with http:// instead of https://).Click “OK” and the following should appear.

Select both of the resulting packages, and hit next – this will download the Android ADT(Android Development Tools). Go ahead and start the download to obtain these two packages. Restart Eclipse (it should prompt you to on completion of the downloads). We’re almost ready to start coding.
Step 5: Configure The Android SDK
Navigate to the folder you downloaded/unpacked the Android SDK to. In there, you’ll find a file named “SDK Setup.exe.” Start that file – the following dialogue should appear.

Don’t feel obligated to download every single thing. Could it hurt? Not really. For me, however, I only really want to program for Android 2.1 and 2.01, so those are the only API packages I bothered to get (someday I may pay for my folly, but not today). Either way, get what you want (and you do need to pick one) and hit install. The SDK manager will install it for a little while – go grab a snack.
Step 6: Set Up Your Android Virtual Device (AVD)
Now that you’ve finished yet another painful download, click over to “virtual devices” (still in the SDK Manager). We’re going to create an Android device that will test run your programs for you! Hit “New” to create a new Android device, and put in the specifications that you want it to have. In the screenshot below, you’ll see the options I wanted (that closely mimic that of my Motorola Droid).

Click “Create AVD” to–well–create your AVD. Select your AVD from the list, and hit “Start” to make sure that you do indeed have a working emulation of an Android phone. After a pretty lengthy start-up wait, it should look something like this.

Fool around with it and explore for a bit if you want, then close it up so we can get back to work.
Step 7: Configure Eclipse Again
Remember that Android SDK we got earlier? We didn’t do anything with it. Now, it’s time to tell Eclipse where it is so Eclipse can use it as a resource. To do this, open Eclipse and navigate toWindow>Preferences (or on Mac, Eclipse>Preferences) and select the Android tab. As shown below, browse to the location of your Android SDK and hit “Apply“.

Everything check out so far? Hit “OK” to save everything and let’s go program.
Step 8: Create A New Project
It’s finally time to code some. Navigate to ‘File>New>Other…>Android>Android Project‘, and input a project name, as well as some other details. If you want, copy from my screenshot below. Some of the fields need explaining that simply doesn’t belong here, so if you want to know more specifically, please let me know and maybe I’ll write an article about it.

Hit “Finish” and the project will be created.
Step 9: Input Your Code
In the tree on the left, navigate to the “src” folder and expand everything. Go to the file with the name of your “Activity” (created in step 8, mine was HelloWorld) and double click it to see the contents. Presently, your code has all of the content in black (with some minor modifications depending on your settings). To make a working “Hello world” program, you need to add the text that is in bold red. Note that there are two bold red “blocks” of code, and you need to add both to make things work.
//==========Start Code============
package com.android.helloandroid;
import android.app.Activity;
import android.os.Bundle;
import android.widget.TextView;
public class HelloAndroid extends Activity {
/** Called when the activity is first created. */
@Override
public void onCreate(Bundle savedInstanceState) {
super.onCreate(savedInstanceState);
TextView tv = new TextView(this);
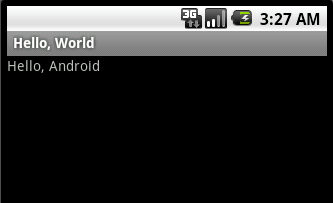
tv.setText("Hello, Android");
setContentView(tv);
}
}
//==========End Code============
I would love to explain all of the code, but that’s not exactly the point of this tutorial; the point is to get your feet off the ground. I know some/most of this is confusing; but it’s just how things are wired.
Step 10: Run Your Program
Above your code, you’ll see a little green “Play” button (or navigate to ‘Run>Run‘). Click it.When a popup box asks you how to run the application, you’re going to tell it to run as an “Android Application”. It will prompt you to save changes; hit yes.
Now you get to wait an eternity while your virtual device boots up. I’d recommend that you leave it open for the duration of your programming sprees, otherwise you’re going to spend more time watching the Android logo spin than you will watching your program freeze up. Just saying. Efficiency.
After everything’s done loading, your application should upload and start automatically. Which means that right after you “unlock” the device, you’ll be greeted with your first Android program.I only captured the top half of the screen because the rest of it is black.

That’s it, congratulations! The task can be a bit daunting at first; and definitely confusing, but if you stick with it you won’t be disappointed. If you step back and think about it, we only did a few really major things, the rest was just the process of connecting the pieces to make everything work.
Do you want to become an Android developer? Have you ever written an Android app, and if so, what did it do? As always I love getting feedback in the comments section. As someone who answered yes to the first question, I’m in the process of learning to adequately code for my Android device, so do you have any websites or pointers that would help me or a fellow Android newbie out?
Trackback: MakeUseOf

Leave A Comment